This guide explains how to perform a migration from an old GateManager 4250/4260/9250 to GateManager 8250
First,
you must at least use Firmware 9.0i on the existing, old GateManager (contact
us for receiving the Downloadlink for this Firmware, if you don't have it already).
- Click Server → Status → Backup to create a new current backup locally
2. Click server → Backups → choose the newest backup
and click "Download backup"
3. Save the backup file locally on your PC.
4. RENAME the file to "daily-1.tgz"
On the NEW GateManager that you have installed do the following steps (guide for installing an 8250 GateManager can be found below).
- Debian Guide 8250: Click Here.
- Redhat Guide 8250: Click Here.
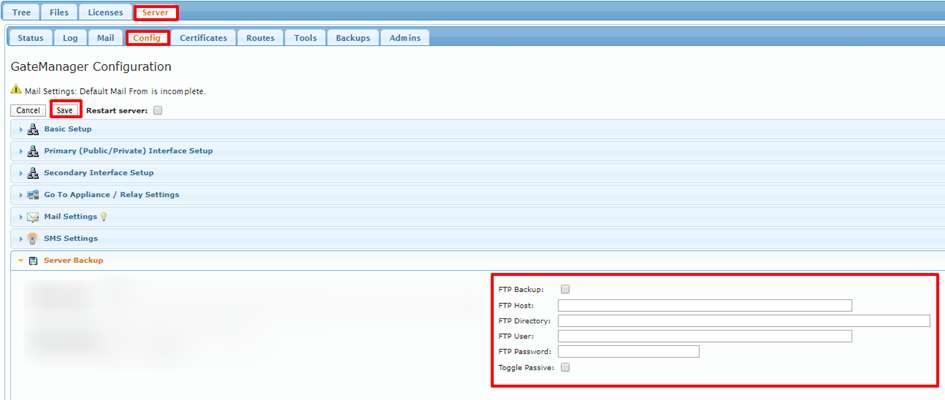
1. Go to Server → Config → and click "Edit"
2. You now have 2 options for uploading the Backup file to the new
Gatemanager, if you have an FTP server available, that is the best way to do
this,
3. Now click Server → status → Backup - this will start a
new backup on the server, once it says it is done proceed to the next step.
- If you have an FTP server fill out the FTP form with your FTP server, username and password information and then click "Save".
-
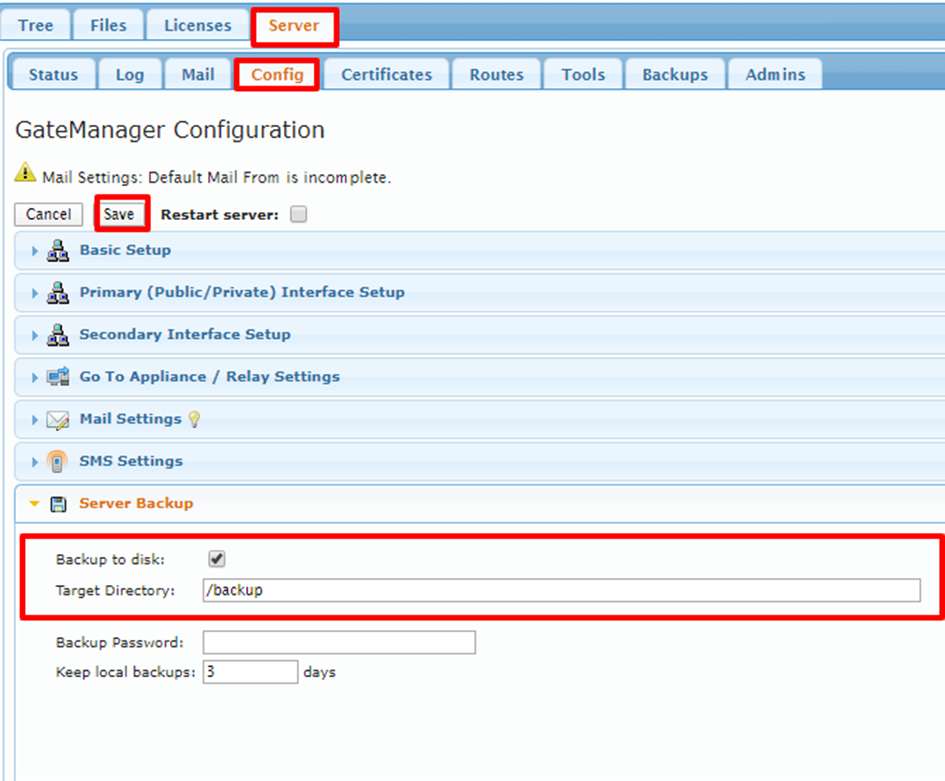
Alternatively, you can just fill out a folder where the backup should be
done locally on the server, by filling out the "Target Directory"
with /backup and making sure "backup to disk" is check marked, after
that click "Save".
4. Depending on your chosen backup method, you must do one of the following
- FTP Backup
- Now restore the backup on the new server by clicking Server → Backups → and choose "daily-1" under "FTP" backups as seen in the picture below and click "Restore Backup"
2. Local folder on the server backup
- Replace the file daily-1.tgz with the file you downloaded earlier in the /backup folder on the server, this can be done by using a program like "WinSCP".
- Now restore the backup on the new server by clicking Server → Backups → checkmark Daily1 under "Local Disk" as seen in the picture below and click "Restore Backup"
5. Now you must checkmark everything except "Verify Only" (you can however do this first if you want to do a test first) and click "Confirm Restore" - the server will now restore the backup - just wait for it to tell you to refresh the browser.
6. Once you refresh the browser the server is now restored, HOWEVER you are still missing licenses - do not make any changes to the server yet -you can verify that users have been created under the "Tree" view
7. Once you confirm that there is data restored on the server you must now send a mail.
-
To: support@secomea.com
-
Subject: Migration of GateManager done- please provide migration
license.
- Provide the following information relating to the new GateManager in the mail
- External Public Hostname: - (This found under "Server → Config → Primary Interface Setup")
- License id: (this is found under "Server → Status → License ID